


Happy 20th Sizzix Birthday!
This month Sizzix reaches our Birthday, celebrating 20 Years of bringing fun and inspiration to the crafting world!
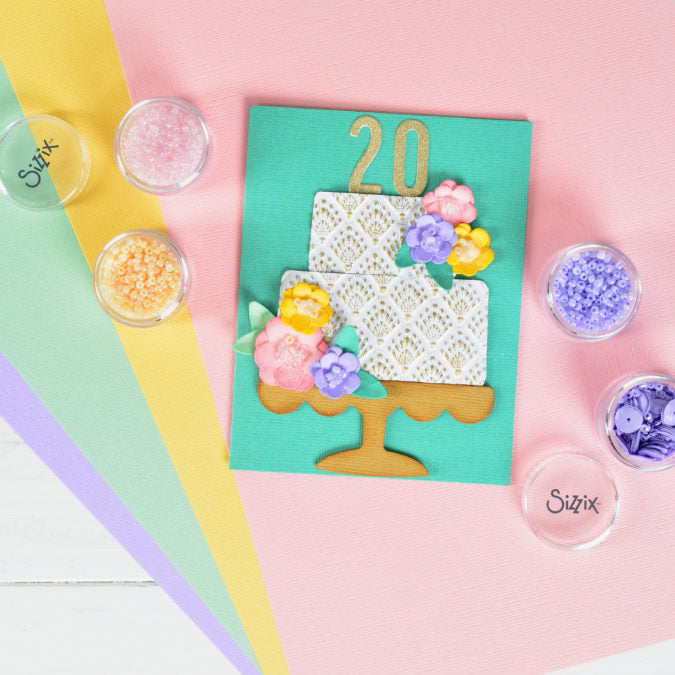
I am so excited to witness this milestone and be a part of the Creative Team at Sizzix. Needless to say, I couldn't pass up the opportunity to create a festive 20th Sizzix Birthday Card in celebration of our big day. Check out my step by step instructions below to see how I created this colorful greeting card.
What you will need:
- Sizzix® Big Shot® Machine (660200)
- Sizzix® 3-D Textured Impressions® Embossing Folder Shells (664514)
- Sizzix® Bigz Die - Celebration Cake (665095)
- Sizzix® Thinlits® Die Set 10PK Bold Numbers (665073)
- Sizzix Effectz Luster Wax, Gold, 20ml (664809)
- Sizzix Making Essential - Foam Tape (663709)
- Sizzix Making Essential - Express Glue, 120ml (664576)
- Sizzix Making Essential Sequins & Beads, Cherry Blossom, 5PK (664602)
- Sizzix Making Essential Sequins & Beads, Lavender Dust, 5PK (664605)
- Sizzix Making Essential Sequins & Beads, Limoncello, 5PK (664604)
- Sizzix Making Tool Multi-Tool Starter Kit (662875)
- Sizzix Making Tool Paper Sculpting Kit (662225)
- Sizzix Multi-Tool Accessory Blending Tool Head w/Replacement Sponge (662880)
- Sizzix Surfacez - Cardstock, 8 1/4" x 11 3/4", 20 Assorted Colors, 80 Sheets (663007)
- Sizzix Surfacez - Cardstock, 10 Botanical Colors, 60 Sheets (665276)
- Sizzix Surfacez - Neutral Colored Cardstock 60PK (663780)
- Sizzix Surfacez The Opulent Cardstock Pack, 50PK (664532)
- Paper Trimmer
- Ranger Distress Ink Pads (Cracked Pistachio, Mustard Seed, Shaded Lilac, Vintage Photo, Worn Lipstick)
- Water Spritzer
How to make our 20th Sizzix Birthday Card:
- Die Cut out of White Cardstock a small and large layer of cake, out of Caramel Toffee Cardstock a cake stand, out of Cherry Blossom, Lavender Dust and Banana Blast Cardstock a variety of small and large flowers, out of two Green Cardstock colors of choice a six leaves from the Celebration Cake Bigz Die. Die Cut out of Gold Glitter Opulent Cardstock the numbers "20" from the Bold Numbers Die Set.

2. Spritz both sides of the White Cake Layers with water and then emboss the elements with the Shells 3-D Sizzix Embossing Folder.

3. Once dry, apply Sizzix Gold Luster Wax across the embossed details on the cake layers. Building the layers of wax until a desired effect is achieved.

4. With a Sizzix Blending Tool Head, apply various shades of ink to the die cut flowers, leaves and cake stand to add dimension.

5. With our Sizzix Stylus Tools and gray molding mat, sculpt the flowers and leaves to create lifelike dimension.

6. Cut a 5 1/2" x 8 1/2" panel of aqua cardstock from the Botanical Cardstock pack. Fold the panel in half to create the card base. Cut and apply foam tape to the back of the two cake layers and cake stand.

7. Arrange the cake layers and cake stand on the card front and adhere them in place. Glue the various flowers together with liquid adhesive and then adhere the stacked flowers and leaves in desired groupings on the cake with liquid adhesive. Adhere the gold glitter numbers directly above the top layer of the cake with liquid adhesive.

8. Apply liquid adhesive to the centers of each flower and place a small amount of Cherry Blossom, Lavender Dust or Limoncello beads into the adhesive on each color coordinated flower stack.

I hope you have enjoyed this quick festive birthday card make. While I may be celebrating Sizzix's 20th Birthday, these dies are perfect for all celebrations and occasions throughout the year!
Until next time...happy crafting!
Alexis
Remember to tag us in your makes using the hashtag #mymakingstory. We hope you loved the 20th Sizzix Birthday Card Blog as much as we did!
Crafted by Sizzix Designer Alexis Trimble


